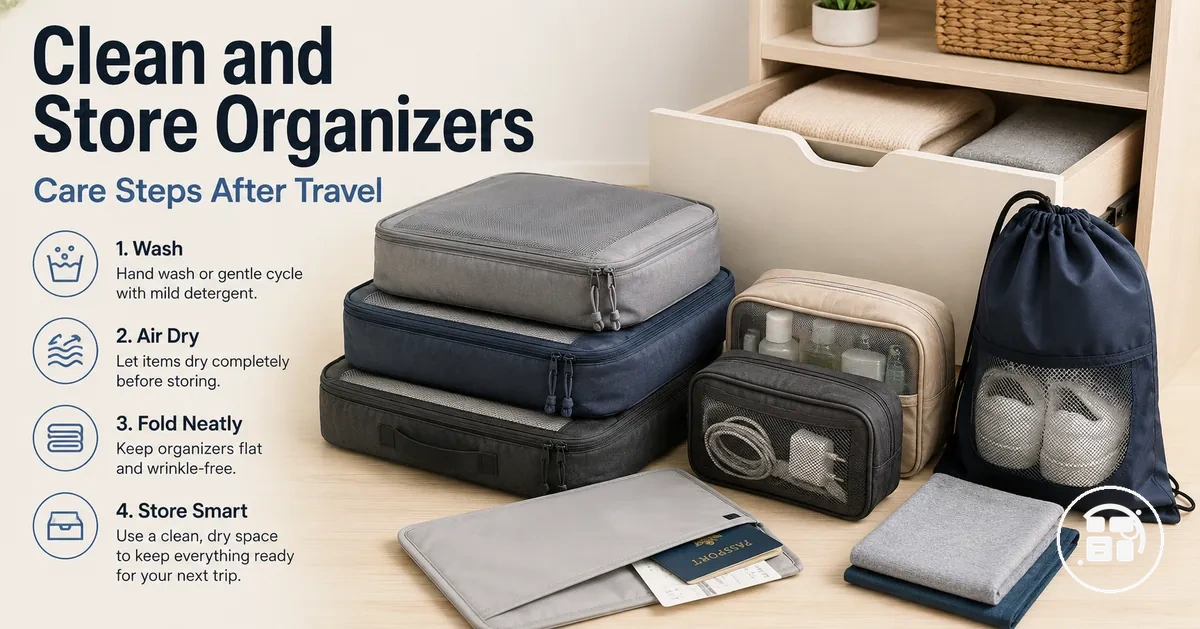
Travel Organization Accessory Care and Storage
Travel organization accessories need cleaning and storage based on their material, residue type, construction, and reuse timing. Packing cubes, toiletry bags, travel pouches, mesh panels, waterproof lining, zippers, seams, compartments, and foldable organizers can all need different care. The main care variables are material, residue, and dryness before storage.
Travel organization accessory care means keeping organizers clean, dry, shaped, and ready for reuse without treating every item as washable in the same way. Cleaning guidance depends on the item material and care label, not on the category name alone. This page sits inside the broader travel organization accessories guide as the maintenance and storage reference.
Residue, moisture, and odor can stay inside compartments, zipper tracks, mesh areas, cleanable pouches, and toiletry pouch corners when organizers are stored too quickly or in poor storage conditions. A safe method starts with checking the organizer before water, detergent, or wiping is used. Washable fabric organizers may allow gentle wash care, while coated or lined pouches often need wipe-first cleaning. Inspection comes before cleaning because the safest method depends on what is inside the organizer and how the material is built.
What to Check Before Cleaning Travel Organizers
Travel organizers exposed to toiletries, shoes, laundry, food residue, moisture, or heavy handling should be inspected before they are packed away for storage. A cleaning check helps identify whether an organizer is clean enough to air out, needs spot cleaning, or may require washing based on its condition. Inspection is the first safe action before any cleaning decision is made.
What to Check Before Cleaning Travel Organizers starts with verifying residue, material condition, and moisture risks before washing or storing. The image below highlights common inspection points that can affect cleaning intensity and storage readiness.
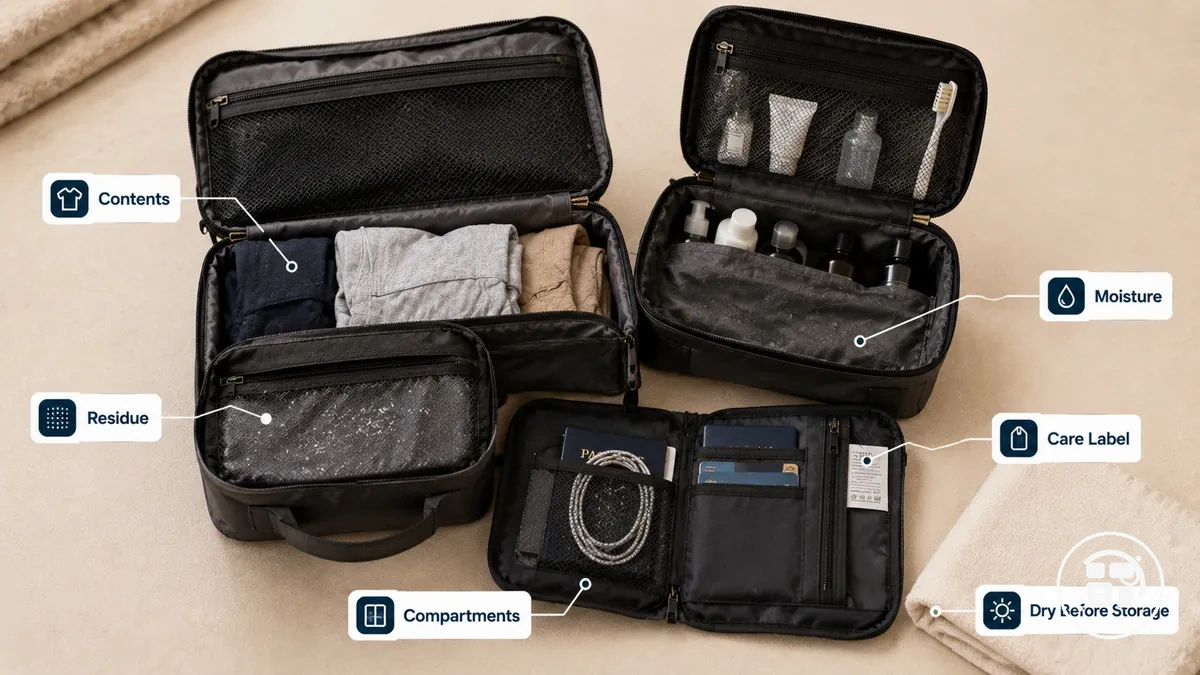
- Check compartments for forgotten contents that may cause residue, odor, or moisture buildup.
- Check for visible residue from liquids, food, toiletries, or other travel items.
- Check for smell that may indicate trapped moisture or residue inside hidden areas.
- Check fabric surfaces for stains, wear, or conditions that may affect cleaning intensity.
- Check zipper and seam condition for signs of damage that could worsen during cleaning.
- Check the care label for material-specific cleaning limitations or recommendations.
- Check whether the organizer is fully dry before storage to reduce moisture-related storage risk.
Residue trapped inside travel organizers can increase storage risk when it remains inside compartments, seams, or hidden pockets. A toiletry bag with liquid residue may need more attention than a lightly used travel pouch, while a packing cube used for laundry exposure may only need airing if the fabric remains dry and odor-free. Organizer type, condition, and residue level help determine appropriate cleaning intensity.
When a packing cube has been used for laundry exposure or a toiletry bag has carried products that may leak, inspection priority becomes higher. Travel organizers that appear clean can still benefit from a quick organizer check for moisture, residue, and compartment condition before storage. This approach is especially useful when selecting organizers for different belongings that may face different spill or storage risks.
Care Labels, Materials, and Washability Limits
Care labels set the cleaning boundary for a travel organizer by identifying material limits, washability considerations, and handling precautions. Materials such as fabric, mesh, polyester, nylon, coated interiors, and waterproof lining can respond differently to cleaning methods. When available, the care label overrides generic category assumptions.
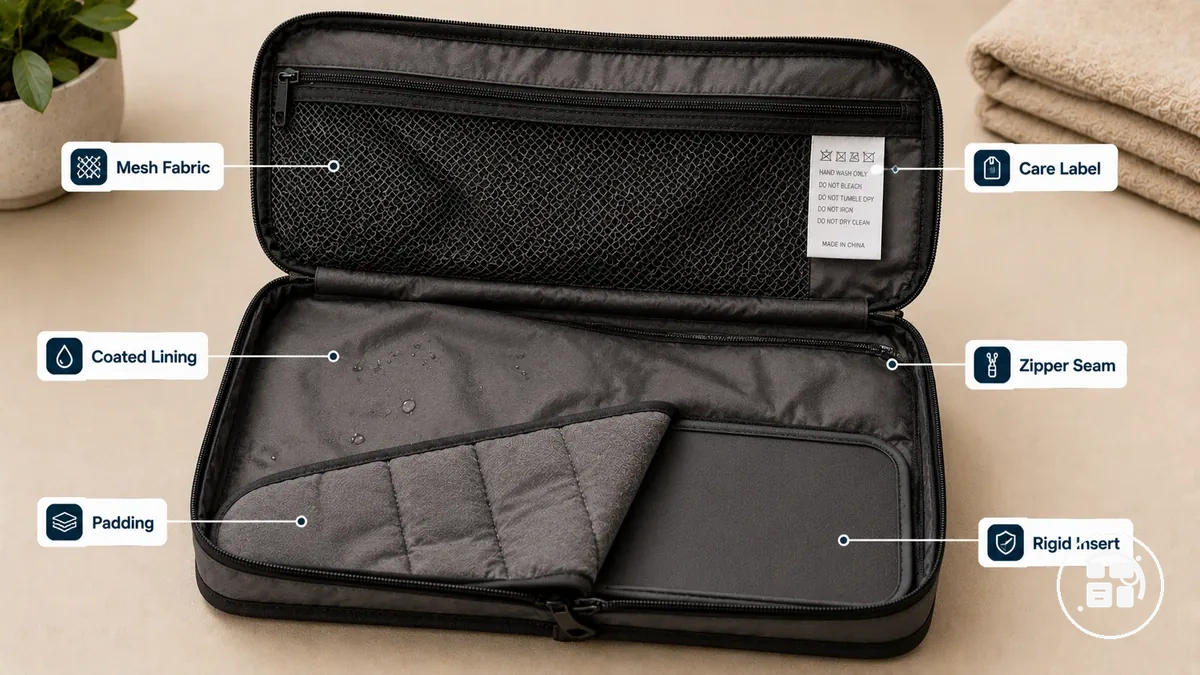
Care Labels, Materials, and Washability Limits organize material risks by showing which parts may require extra caution during cleaning. Material features can influence cleaning safety, but they do not confirm washability on their own.
- Mesh and fabric sections may be more vulnerable to snagging when the material is already worn or stretched.
- Coating and waterproof lining may require gentler cleaning when the surface shows signs of peeling, cracking, or wear.
- Zipper and seam areas can face greater damage risk when force is applied to stressed or weakened sections.
- Padding may retain moisture longer and can require additional drying attention before reuse.
- Rigid inserts may support structure but can limit soaking or other more aggressive cleaning methods.
When material uncertainty affects a cleaning decision, the safest approach is to match the method to the care label, material limit, and construction details. Washability may vary between fabric sections and coated or structured parts within the same organizer. Heat tolerance, waterproof claims, and coating durability can depend on material condition and construction. For a broader explanation of evaluation criteria, see materials and washability features.
Emptying Pockets, Compartments, and Toiletry Residue
When cleaning starts before compartments are emptied, debris, moisture, and hidden residue can remain trapped inside areas that are difficult to reach later. Pockets, compartments, seams, and zipper tracks should be checked first so visible and hidden contents can be removed. Every compartment should be checked before water or detergent.
Emptying Pockets, Compartments, and Toiletry Residue follows a practical sequence that helps prevent trapped residue before cleaning. The image below demonstrates what should be removed or checked before washing, wiping, or drying.
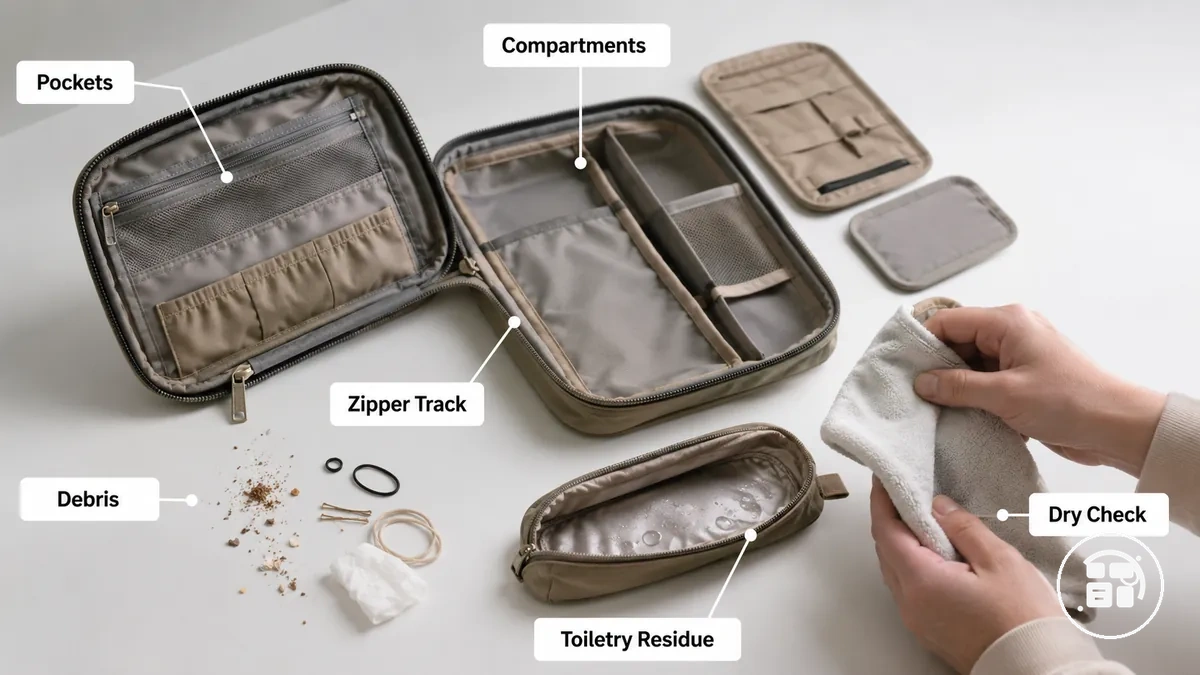
- Empty all pockets and compartments, then confirm that no small items remain inside hidden sections.
- Open divider panels and inner pockets, then check for trapped debris that can be shaken out before cleaning.
- Remove liquids and removable inserts, then inspect the exposed lining for residue or moisture.
- Shake out the organizer gently, then verify that debris is no longer collecting in corners or folds.
- Wipe visible toiletry residue from pouch corners and compartment edges, then check whether residue remains in less visible areas.
- Inspect seams and zipper tracks, then look for trapped residue or moisture that may remain after surface cleaning.
- Perform a final dry check, then confirm that compartments and removable inserts are ready for the next cleaning step.
When a toiletry pouch has residue left in a corner compartment, the residue can remain hidden even when the main compartment appears clean. A wipe and residue check may be enough when the affected area is small. Avoid leaving toiletry residue in pouch corners, seams, or zipper tracks where it can remain trapped.
How to Clean Fabric Organizers and Packing Cubes
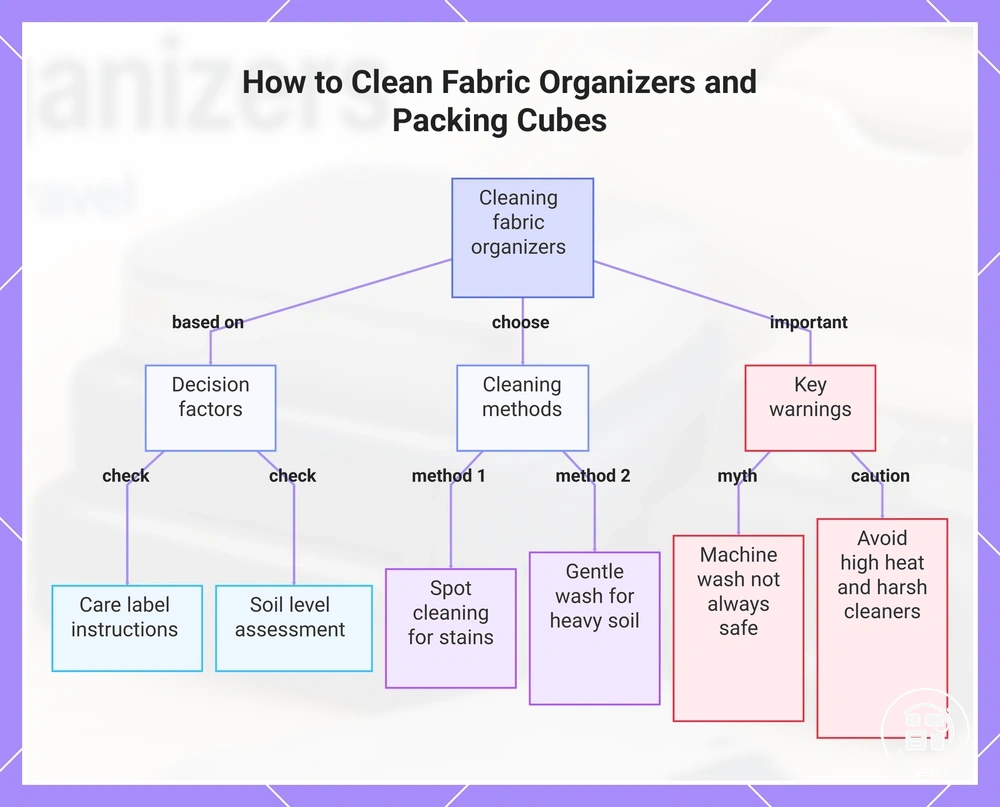
Fabric organizers and packing cubes are usually cleaned with a gentle wash or spot cleaning, depending on the care label, structure, and soil level. Mesh panels, compression features, and fabric strength can affect how much handling an item may tolerate during cleaning. The care label and soil level are the main decision variables.
When dirt, spills, or dirty laundry exposure increase the soil level, the cleaning method should match the condition of the fabric organizers and packing cubes. Fabric organizers with light surface dirt may only need a light refresh, while deeper cleaning may be considered when residue or heavier soil is present. Mesh panels can have a higher snag risk during cleaning, and compression panels may require gentler handling to help preserve shape. Mild detergent and cold water support a gentler cleaning approach, separating light refresh cleaning from a deeper clean.
- Check the care label and soil level, then choose spot cleaning or a gentle wash method that matches the organizer condition; avoid assuming machine washing is suitable.
- Close each zipper closure before cleaning, then confirm that mesh panels and seams are not exposed to unnecessary snag risk.
- Use mild detergent with cold water when cleaning is needed, then watch for possible color bleeding during rinsing.
- Apply spot cleaning to isolated stains when the soil level is limited, then reduce rubbing pressure if the fabric or mesh appears delicate.
- Use gentle handling during washing when the care label allows it, then avoid unnecessary agitation around mesh sections and compression panels.
- Rinse thoroughly when detergent remains visible, then check whether fabric organizers retain residue in folds, seams, or panel edges.
- Air dry the organizer after cleaning, then confirm that mesh panels, zippers, and compression features are fully dry before reuse.
It is a myth that all fabric organizers and packing cubes are machine washable. Machine washing may depend on mesh durability, compression panel construction, and other structural features that can affect wash risk. Avoid high heat and harsh cleaners that may affect fabric condition, color, coatings, or shape.
This chart shows the key decision factors, cleaning methods, and important warnings for cleaning fabric organizers and packing cubes.
Machine Washing on a Cold Gentle Cycle
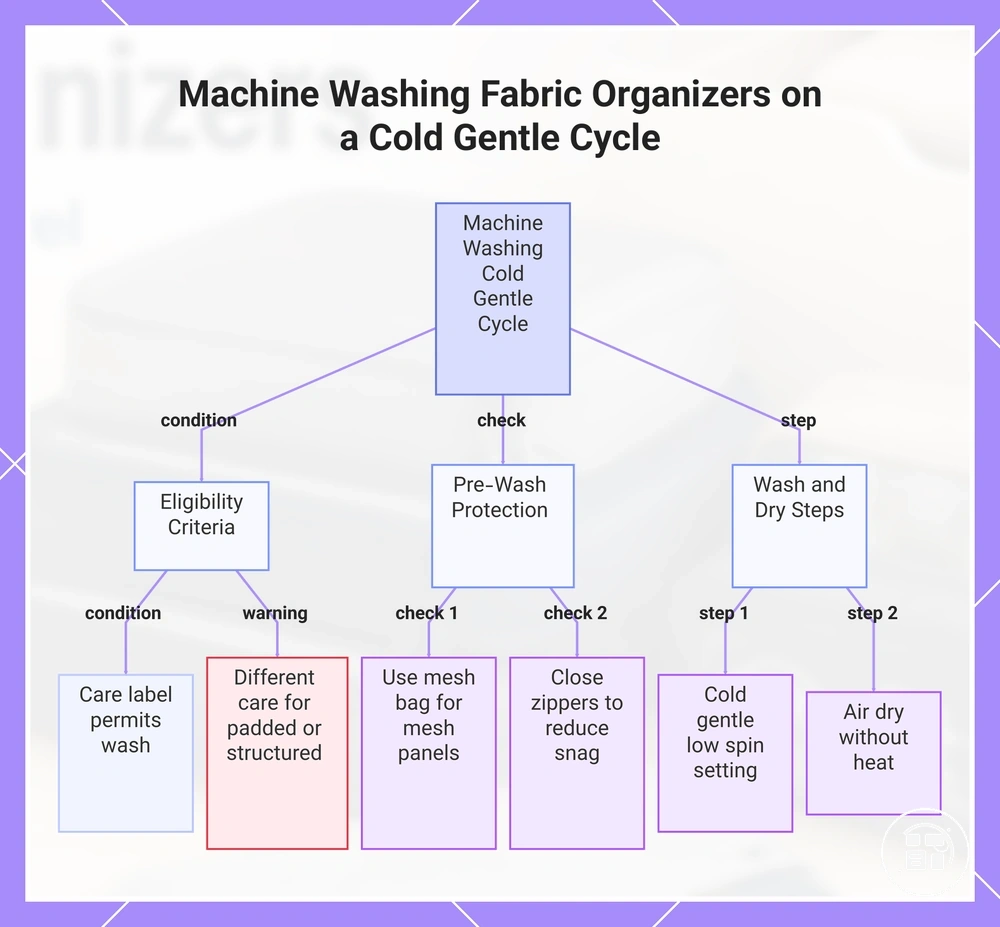
A cold gentle cycle may be appropriate for washable fabric organizers when the care label permits machine washing and the construction does not increase wash risk. Washable fabric organizers can sometimes be cleaned with a gentle machine wash, while padded, coated, or heavily structured items may require a different approach. Care-label permission is the main condition.
When machine washing raises concerns about wear, a low-agitation setup can help reduce stress on fabric components. Machine Washing on a Cold Gentle Cycle should begin with an eligibility check, and the checklist below helps verify whether machine washing is appropriate. Remove the organizer before heat drying and allow it to air dry.
- If the care label permits machine washing, a cold gentle cycle may be used; if machine washing is not permitted or no label is available, machine washing should be avoided.
- If the fabric organizer contains mesh panels, placing it inside a mesh bag or laundry bag may provide added snag protection; if mesh damage is already visible, machine washing may not be appropriate.
- If zipper closure is available, close all zippers before washing; open zippers can increase snag risk during a low-agitation cycle.
- If mild detergent is suitable for the cleaning task, use it with a cold wash; stronger cleaners should be avoided when they may increase stress on fabrics or finishes.
- If multiple colors are present or color transfer is a concern, use color separation before washing; if color stability is uncertain, additional caution may be needed.
- If a cold gentle cycle is used, choose a low spin setting when available and remove the organizer after washing for air dry; padded, coated, or heavily structured organizers should not be treated as automatically machine washable.
This chart shows the eligibility criteria, pre-wash precautions, and wash/dry steps for safely machine washing fabric organizers on a cold gentle cycle.
Hand Washing and Spot Cleaning When Machine Washing Is Risky
Hand Washing and Spot Cleaning When Machine Washing Is Risky starts with choosing a cleaning method that gives more control over water exposure and rubbing pressure. If machine washing could affect coating, stitching, padding, inserts, or structure, hand washing or spot cleaning may be a safer option. Hand cleaning controls water and pressure.
When a stain is limited to one area, spot cleaning may be enough without cleaning the entire organizer. If a soft fabric organizer needs broader cleaning and the care label allows it, hand washing can provide more controlled cleaning than a machine cycle. Avoid excessive saturation around padding, inserts, coated surfaces, or sensitive stitching.
- Prepare lukewarm water and add a small amount of mild soap suitable for hand washing.
- Place the fabric organizer in the water if full hand washing is appropriate, then use gentle pressure rather than stronger rubbing.
- Clean fabric panels and stitching carefully, then check whether dirt is lifting before increasing pressure.
- Use rinse control to remove soap residue, then avoid unnecessary water exposure around padding or inserts.
- Allow excess water to drain naturally, then reshape the organizer if needed and let it air dry.
- If the stain is localized, use spot cleaning with a soft cloth and a small amount of mild soap.
- If the stain area is near stitching or a coated surface, use lighter rubbing pressure and a gentle wipe.
- If padding or inserts sit beneath the stain area, limit saturation and keep rinse control focused on the affected section.
- If the stain remains after cleaning, repeat localized cleaning carefully rather than increasing scrubbing force.
How to Clean Toiletry Bags and Travel Pouches
Toiletry bags and travel pouches should usually be wiped first and washed only when the cleanable pouch material allows it. A waterproof interior, vinyl lining, plastic lining, fabric exterior, zipper tracks, soap residue, makeup spill, leaks, and odor can each change the safer cleaning action. For many pouches, wiping comes before washing.
When residue remains inside a pouch after a trip, the pouch area and lining material should guide the cleaning method. A waterproof interior, vinyl lining, or plastic lining can often be cleaned with a wipe-first approach using mild soap, while a fabric exterior may require spot cleaning when a stain is limited to the outer surface. Zipper tracks and corner seams can retain soap residue, makeup spill residue, or moisture after a leak, so these areas may need additional attention. Cleaning intensity should match the lining type and residue condition.
How to Clean Toiletry Bags and Travel Pouches depends on matching pouch material and residue type to a safer cleaning method. The table below organizes pouch area, residue or condition, cleaning action, and drying or risk notes.
| Pouch area | Residue or condition | Safer cleaning action | Drying or risk note |
|---|---|---|---|
| Waterproof lining | Soap residue or light spill | Wipe with a damp cloth and mild soap when the lining supports wipe-clean care | Dry the lining fully before closing the pouch |
| Fabric exterior | Surface stain or makeup spill | Use spot cleaning with gentle pressure when the fabric condition allows it | Air dry before storage to help reduce odor risk |
| Zipper track | Residue near the zipper area | Wipe the zipper track carefully when residue is visible | Check for trapped residue before storage |
| Corner seam | Leak residue in a pouch corner | Use a controlled wipe and repeat only if residue remains | Moisture may remain hidden if the pouch is closed too soon |
| Odor-prone area | Damp odor or lingering residue | Clean the residue source and improve ventilation | Odor reduction may depend on drying completeness and residue level |
It is a myth that a waterproof interior means the entire toiletry bag is fully washable. Waterproof interiors can support wipe-first cleanup when the lining allows it, but coatings, fabric exteriors, seams, and zipper tracks may still require separate care. A waterproof interior should be treated as a lining characteristic rather than a sign of full washability.
Wiping Waterproof, Plastic, and Vinyl Interiors
Wiping Waterproof, Plastic, and Vinyl Interiors starts with removing surface residue using a damp cloth and mild soap rather than relying on heavier cleaning methods. A waterproof interior, plastic lining, vinyl lining, or other wipe-clean lining may need controlled surface cleanup followed by thorough drying. The basic sequence is wipe, rinse, dry, and inspect.
When cloudy residue, trapped moisture, or visible buildup appears around corners, seams, or zipper edges, cleaning should focus on the affected surface rather than deeper saturation. A coating may become more vulnerable when exposed to harsh cleaning methods, and coating peel can be a concern when the inner lining is stressed. Surface cleanup supports maintenance, while soaking and abrasive tools can increase damage risk.
- Wipe the waterproof interior, plastic lining, or vinyl lining with a damp cloth and mild soap when residue is visible.
- Rinse the cleaned surface with a lightly damp cloth if soap residue or cloudy residue remains.
- Dry corners, seams, zipper edges, and other moisture-prone areas, then improve ventilation until the interior appears dry.
- Inspect the coating, inner lining, and cleaned surfaces for remaining residue, trapped moisture, or signs of coating peel.
Surface cleanup helps maintain a waterproof interior, but it should not be treated as a measure of leakproof performance. Avoid abrasive tools and solvent cleaners, and do not assume that every coated interior, plastic lining, or vinyl lining can tolerate soaking.
Treating Stains, Spills, and Odors Without Saturating the Bag
When stains, spills, or odors appear inside a travel bag or pouch, localized treatment is usually less risky than broad cleaning. Cleaning intensity should match the residue type, affected material, and moisture sensitivity of the area. Treating Stains, Spills, and Odors Without Saturating the Bag works best when the spill type determines the least risky treatment.
It is a myth that more water or repeated cleaning automatically improves results. Saturation can increase stress on absorbent fabric patches, padded areas, and coated panels that may be sensitive to excess moisture. If a damp odor persists after cleaning, airing out may be more appropriate than repeated washing, and repeated soaking should be avoided.
- Problem: A shampoo leak leaves spill residue on a pouch surface. Action: Remove the residue with controlled wiping and limited moisture, then inspect the area. Risk note: Excess saturation may spread residue into seams or nearby materials.
- Problem: A makeup stain affects an absorbent fabric patch. Action: Use targeted cleaning with a soft cloth and controlled pressure on the localized stain. Risk note: Aggressive rubbing may affect the fabric surface.
- Problem: Food residue remains in a corner or fold. Action: Remove visible residue first, then clean only the affected area. Risk note: Remaining residue may contribute to odors during storage.
- Problem: A damp odor remains after the bag appears clean. Action: Check the odor source, perform a dry check, and improve airflow through airing out and ventilation. Risk note: Repeated washing may not address trapped moisture.
- Problem: Detergent residue remains after cleaning. Action: Use rinse control to remove remaining residue without oversaturating the material. Risk note: Residual detergent may contribute to odor or surface buildup.
- Problem: A spill reaches a coated panel. Action: Clean the affected area with controlled moisture and inspect the coating afterward. Risk note: Saturation may increase the risk of coating wear or peeling.
How to Dry Travel Organization Accessories Safely
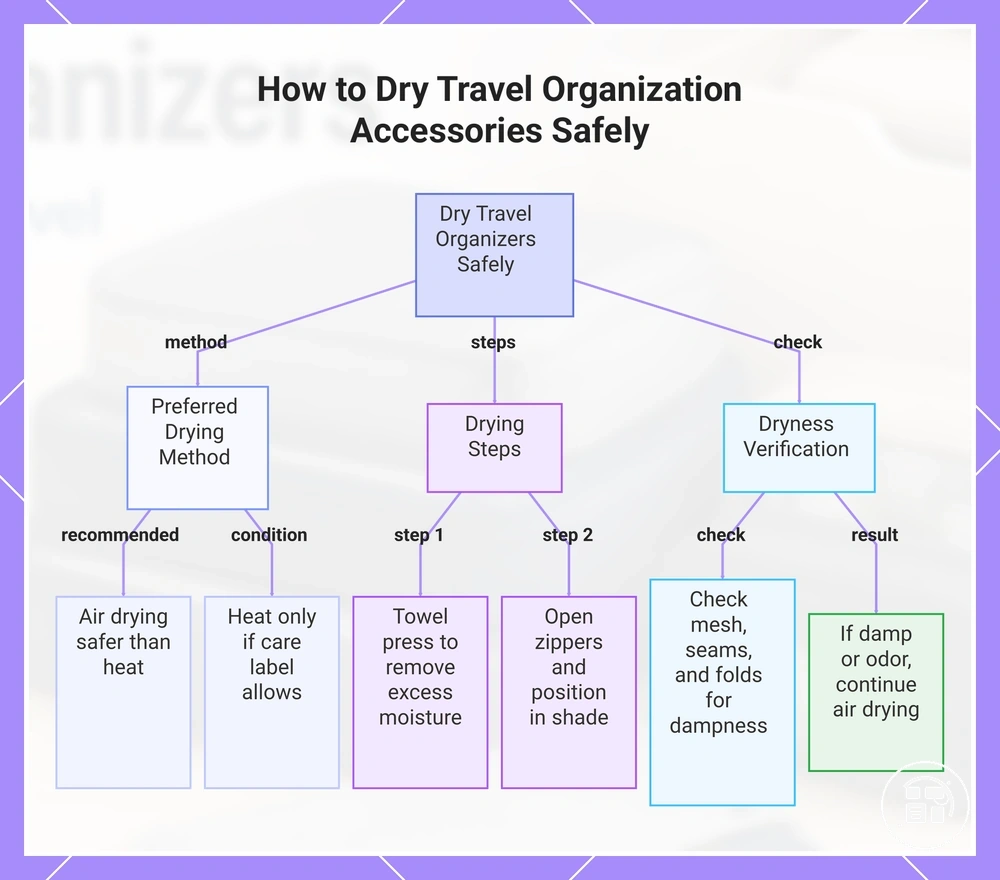
How to Dry Travel Organization Accessories Safely starts with air drying them fully before storage, which is usually safer than heat drying unless the care label indicates otherwise. Drying helps reduce odor, mildew risk, and shape distortion that may occur when moisture remains inside the organizer. Full dryness is the condition that should be met before storage.
When hidden moisture remains inside travel organization accessories, odor and storage problems may develop even when outer surfaces appear dry. Air drying works best when airflow can reach compartments, seams, mesh panels, and coated interiors. Open zippers, separated compartments, and towel pressing can help remove excess moisture without stressing the organizer structure. Proper drying depends on airflow reaching areas where hidden moisture may collect, which is why open compartments and ventilation matter.
How to Dry Travel Organization Accessories Safely relies on verifying drying readiness before storage. The steps below help confirm that moisture has been removed from visible and hidden areas.
- Remove excess moisture with towel pressing, then avoid twisting or compressing fabric sections that may affect shape.
- Open zippers and separate compartments so airflow can reach interior surfaces and seams.
- Lay flat or position the organizer so mesh panels and coated interiors remain exposed to ventilation.
- Place the organizer in shade when drying, especially if heat sensitivity or care-label restrictions may apply.
- Check compartments, folds, seams, and corners for hidden moisture during the drying process.
- Perform a dry check before storage, then continue air drying if any damp area remains.
- Open zippers allow airflow to reach interior spaces.
- Compartments feel fully dry during a dry check.
- Mesh panels and coated interiors show no remaining moisture.
- No odor suggests that moisture may still be trapped inside.
If a travel organizer still feels damp, contains hidden moisture, or develops odor during a dry check, it is not ready for storage yet. Drying time can vary with fabric thickness, humidity, compartment design, and airflow conditions. Once drying readiness is confirmed, the organizer can be used again for packing with clean organizers.
This chart shows the preferred drying method, key steps, and verification check for safely drying travel organizers.
How to Store Travel Organizers Between Trips
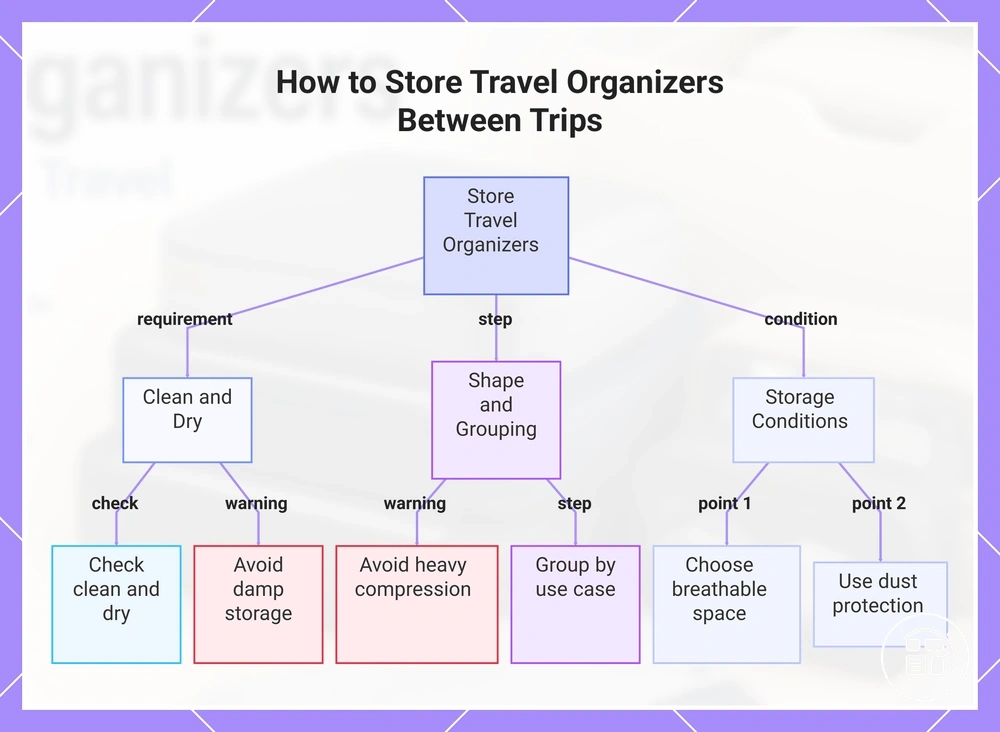
How to Store Travel Organizers Between Trips starts with placing them in storage only after they are clean and dry. Travel organizers remain easier to find and reuse when shape, grouping, and storage conditions are considered together. Only clean and dry organizers should be stored.
How to Store Travel Organizers Between Trips depends on verifying dryness, shape, and findability before putting items away. The checklist below helps confirm that organizers are ready for storage between trips.
- Confirm that all travel organizers are clean and dry before storage.
- Keep a foldable travel organizer in a shape that avoids unnecessary compression or deep creases.
- Use nesting when organizer sets fit together without forcing compartments or panels.
- Place small accessories inside a storage pouch or storage bag when grouping improves findability.
- Choose a breathable space when possible, especially if humidity or moisture exposure is a concern.
- Use dust protection that does not trap moisture around stored organizers.
- Group organizers by use case so they remain easier to locate for the next trip.
When travel organizers are stored while damp, odor and moisture issues may develop during storage. A foldable travel organizer may retain its shape more effectively when heavy compression is avoided, while nesting can support set organization when space allows. Storage location depends on conditions: a breathable space may help when humidity is a concern, while dust protection may help in areas where stored items are exposed. Folding, nesting, and breathable storage support readiness between trips.
If a travel organizer set includes packing cubes, toiletry bags, and small accessory pouches, grouping them together can improve findability before the next trip. A storage pouch may help keep related items organized, while separate grouping can be useful when organizers serve different travel purposes. The goal is to maintain clean and dry organizer storage that remains easy to locate and reuse.
This chart shows the key requirements for storing travel organizers between trips: clean and dry, proper shape and grouping, and suitable storage conditions.
Folding, Nesting, and Keeping Organizer Sets Together
Folding, Nesting, and Keeping Organizer Sets Together starts with arranging organizer sets so pieces remain easy to find and ready to reuse. Cubes, pouches, and small accessories stay more organized when they are grouped together instead of stored separately. Folding, nesting, and grouping are the main actions.
When organizer sets are stored without structure, small pieces may be misplaced and shape stress can develop over time. Fold lines, zipper position, and cube size should guide how pieces are arranged. Avoid unnecessary over-compression because it may increase creasing or fabric stress around fold lines and zippers.
- Arrange cubes by cube size so larger pieces can support smaller pieces during nesting.
- Nest inside compatible organizer sets when the arrangement does not force compartments or panels out of shape.
- Keep pouch grouping consistent so related accessories remain together and easier to locate.
- Store removable straps with the matching pouch set to reduce the chance of lost small pieces.
- Use labels when needed to improve findability across organizer sets with similar sizes or purposes.
- Check zipper position and fold lines before storage to help limit unnecessary stress from over-compression.
Storage Conditions That Reduce Dust, Moisture, and Odor
Storage Conditions That Reduce Dust, Moisture, and Odor refers to storage environment factors that affect organizer readiness between uses. Conditions such as airflow, humidity, sunlight exposure, and compression weight can influence how organizers are maintained over time. Storage conditions influence moisture, dust, and odor risk.
When travel organizers are stored in a damp, overheated, or heavily compressed environment, storage risks may increase. A dry shelf, breathable bins, controlled airflow, and limited compression weight can help reduce those risks when conditions allow. These conditions may reduce the likelihood of odor, moisture retention, or material stress, but they do not guarantee prevention.
| Better storage condition | Risk to watch |
|---|---|
| Dry shelf with airflow | High humidity may increase moisture retention when ventilation is limited |
| Breathable bins or ventilated storage | Dust exposure may increase if stored in a more open space |
| Closed drawer with occasional airflow | Lingering fragrance or odor may remain when ventilation is restricted |
| Limited sunlight exposure | Direct sunlight may contribute to fabric stress or color fading over time |
| Low compression weight on stored organizers | Excess compression weight may increase creasing or shape stress |
Care Mistakes That Shorten Organizer Lifespan
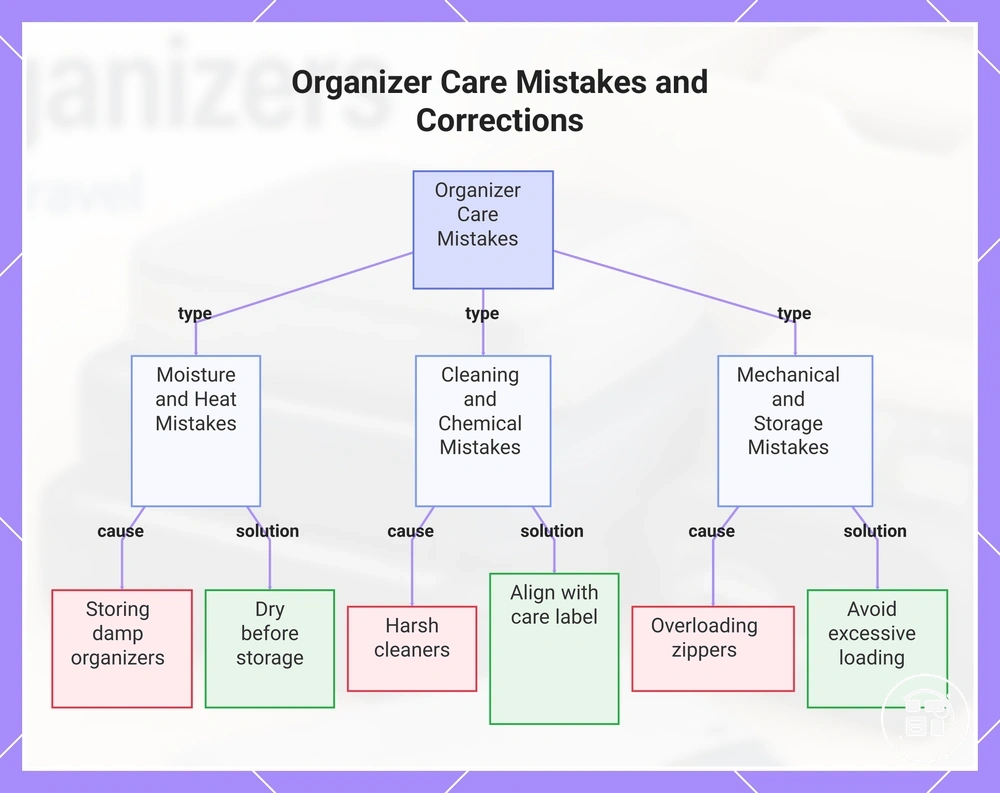
When travel organizers develop odor, lose shape, or show premature wear, maintenance errors are often part of the cause. Recognizing care mistakes early can help reduce damage risk and support longer organizer lifespan. Most care mistakes come from moisture, heat, abrasion, or overload.
When maintenance habits do not match the organizer material or structure, small issues can become more noticeable over time. Damp organizers may retain odor and create moisture-related storage concerns, while heat may affect fabric condition, coatings, or shape. Harsh cleaners, abrasive scrubbing, overloaded zippers, and ignored residue can each create different forms of wear. The outcome often depends on how the mistake interacts with the material, coating, seam, or odor source.
Care Mistakes That Shorten Organizer Lifespan are easier to address when the likely issue and safer correction are identified together. The troubleshooting list below maps common mistakes to consequences and safer corrections.
- Mistake: Storing damp organizers. Likely issue: Odor or moisture-related storage problems may develop. Safer correction: Store organizers only after they appear fully dry.
- Mistake: Using heat during drying or storage. Likely issue: Fabric, coatings, or shape may be affected by excessive heat. Safer correction: Use lower-stress drying and storage conditions when possible.
- Mistake: Using harsh cleaners. Likely issue: Surface condition or coatings may experience unnecessary wear. Safer correction: Choose cleaning products that align with the care label.
- Mistake: Overloading zippers. Likely issue: Seam stress or zipper stress may increase over time. Safer correction: Reduce strain by avoiding excessive loading.
- Mistake: Scrubbing coatings aggressively. Likely issue: Coatings may show surface wear or abrasion. Safer correction: Use gentler cleaning pressure and controlled wiping.
- Mistake: Ignoring residue after spills or use. Likely issue: Residue may contribute to odor or surface buildup. Safer correction: Remove residue before long-term storage.
- Mistake: Compressing structured bags heavily. Likely issue: Compression may increase creasing or shape stress. Safer correction: Store structured sections with less pressure when practical.
- Mistake: Mixing dirty and clean pouches. Likely issue: Residue or odor may transfer between stored items. Safer correction: Keep clean and used pouches separated when possible.
If material uncertainty remains, use the care label as the primary reference before making maintenance decisions. When care instructions are unclear or unavailable, a more cautious cleaning and storage approach is usually preferable to guesswork. For additional clarification, see maintenance questions about organizers.
This chart shows the most common care mistakes that shorten organizer lifespan and their safer corrections.